Overview
Overwatch lets you customize your crosshair, also called a reticle, so your aim indicator better matches your hero, screen size, visibility needs, and personal preference. A good reticle will not magically improve aim overnight, but it can make tracking targets, landing precision shots, and reading your screen much easier.
The settings are available from the in-game options menu, and you can apply them globally or set a different reticle for individual heroes. This guide explains where to find the crosshair settings, what each option does, and how to tune a practical reticle for different playstyles.
How to Customize Your Crosshair in Overwatch
The main way to change your crosshair is through the game’s control settings. The exact wording may vary slightly depending on platform and game version, but the path is generally the same on PC and console: open the menu, go to controls, select reticle settings, then adjust the style and advanced values.
Step 1: Open the Options Menu
From the main menu, pause menu, or practice range, open the game menu and select Options. On PC, you can usually press Esc from the main menu or during a match, then choose Options. On console, press the menu/options button on your controller and open Options.
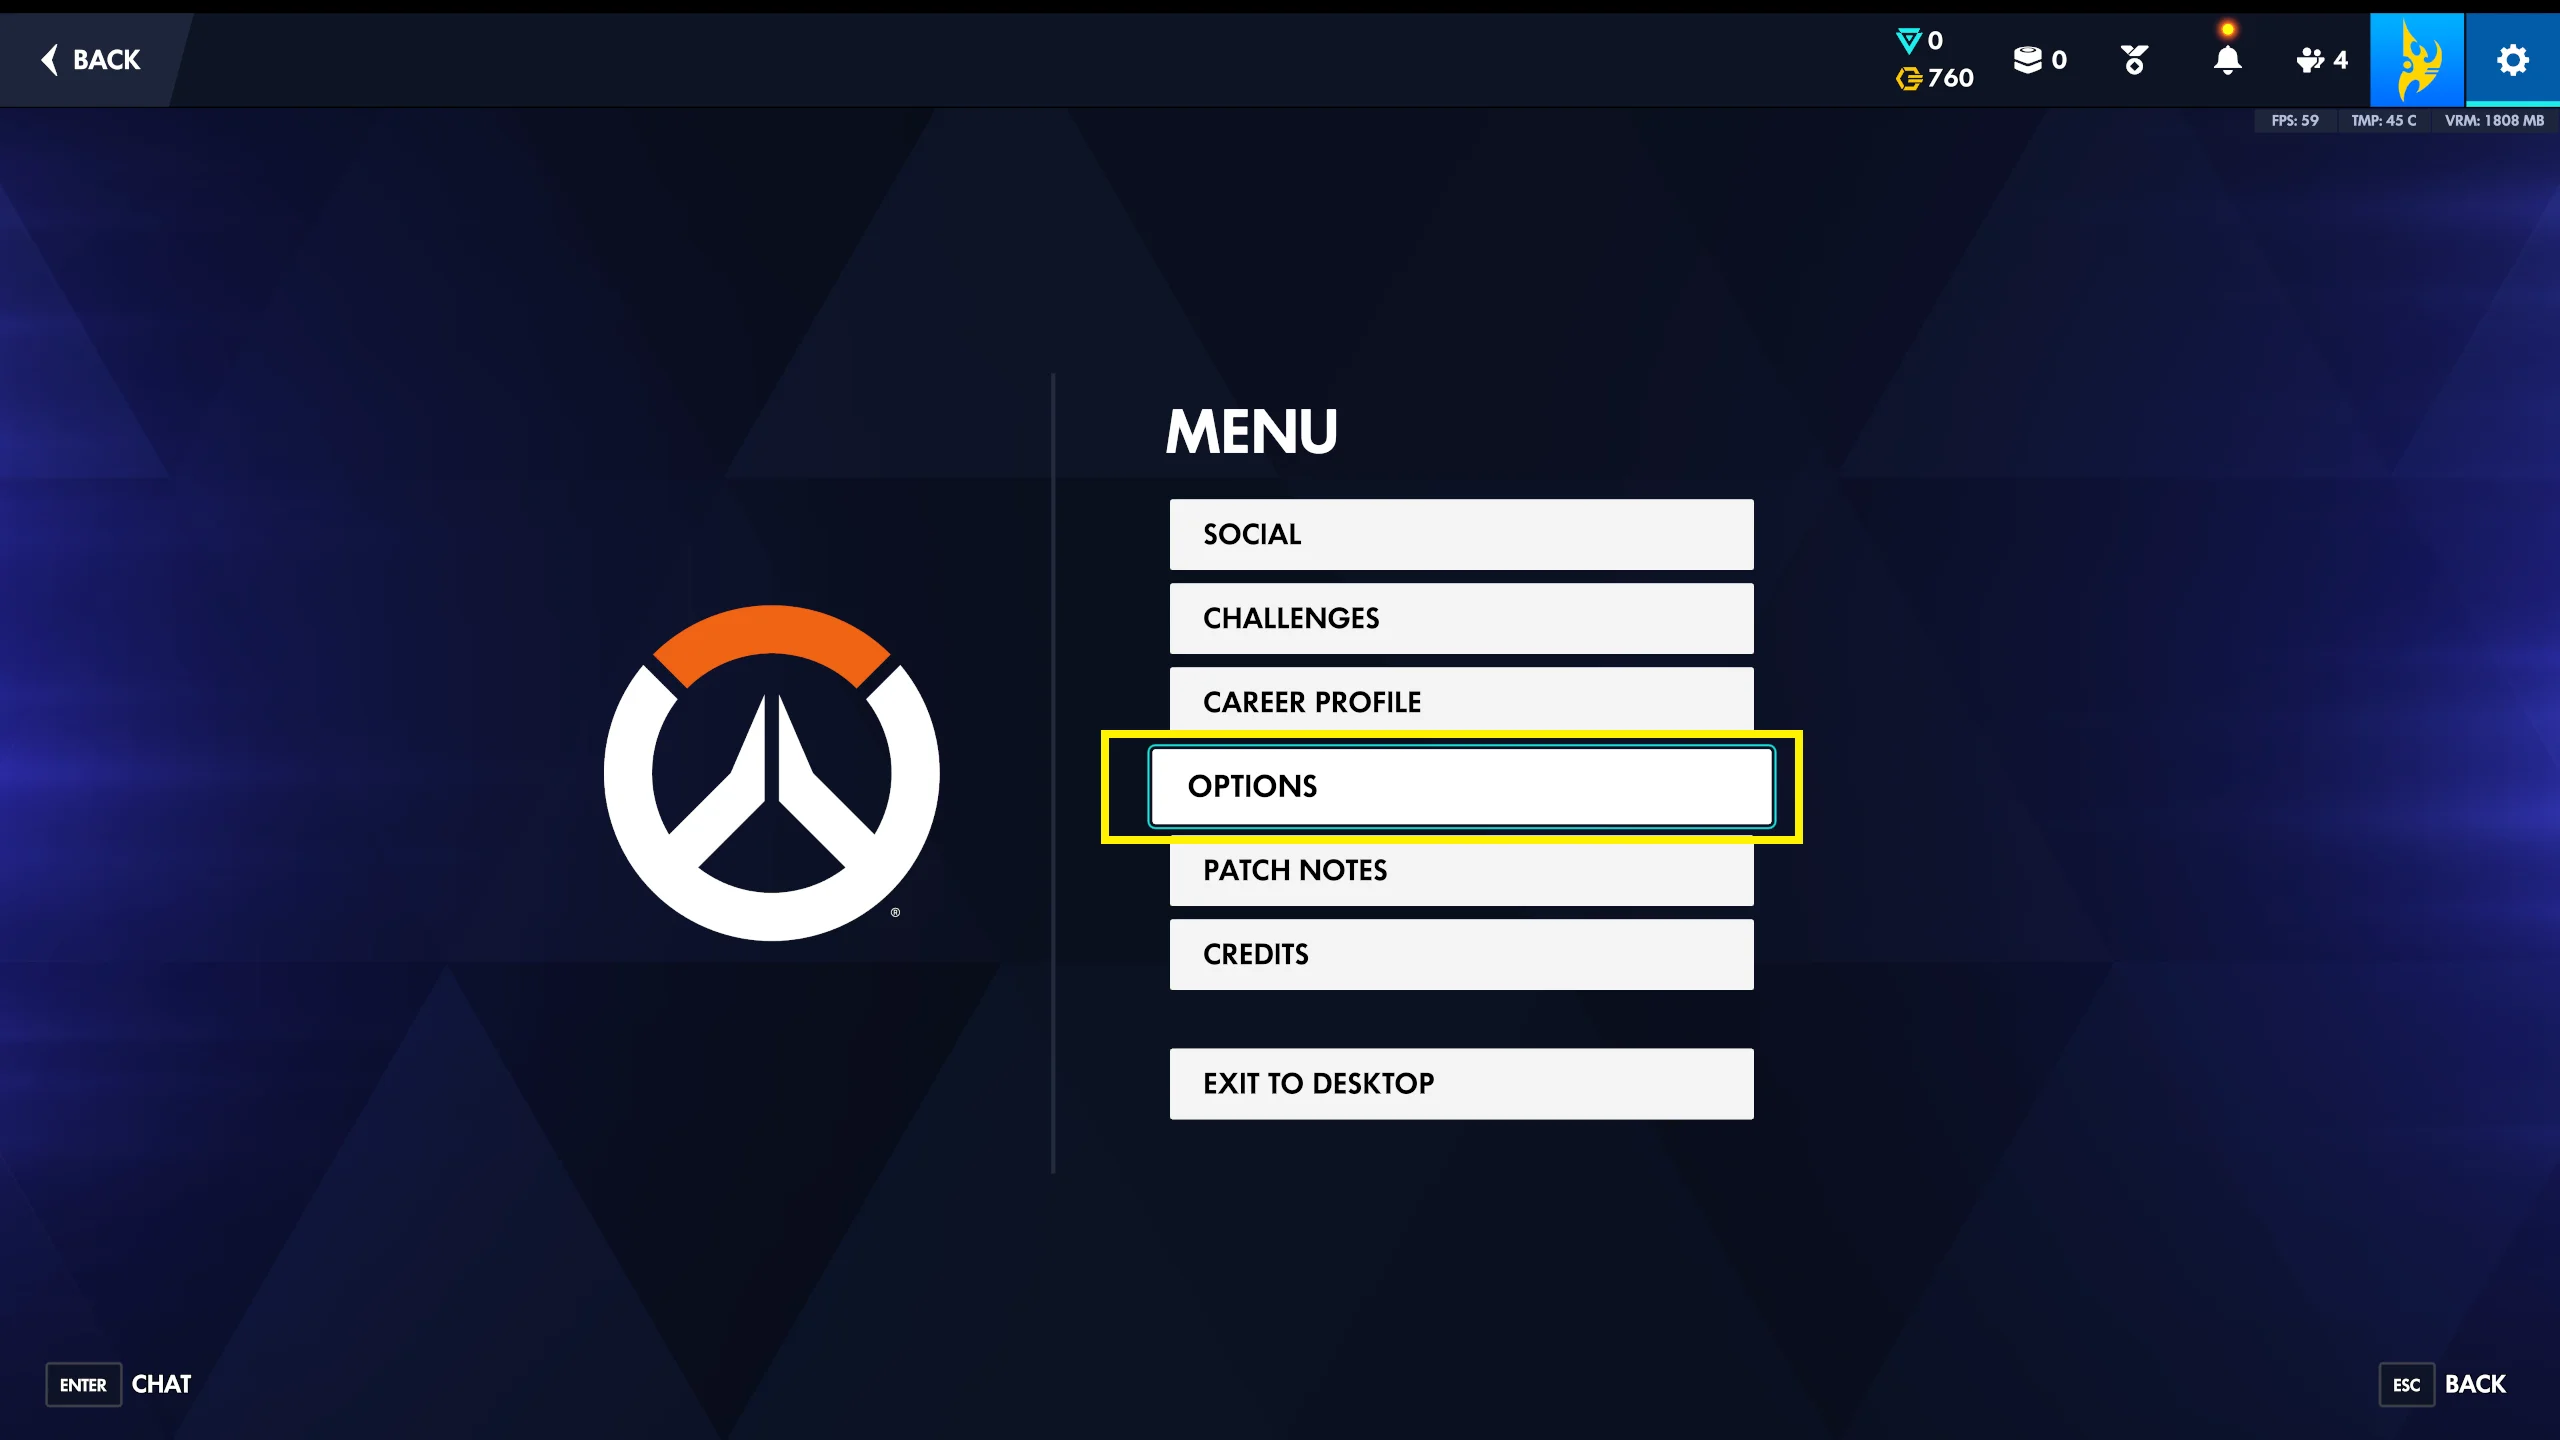
If you are testing a new reticle, the Practice Range is the best place to do it. You can change settings, shoot bots, and immediately see whether your new crosshair feels clear without affecting a real match.
Step 2: Go to Controls and Choose a Hero
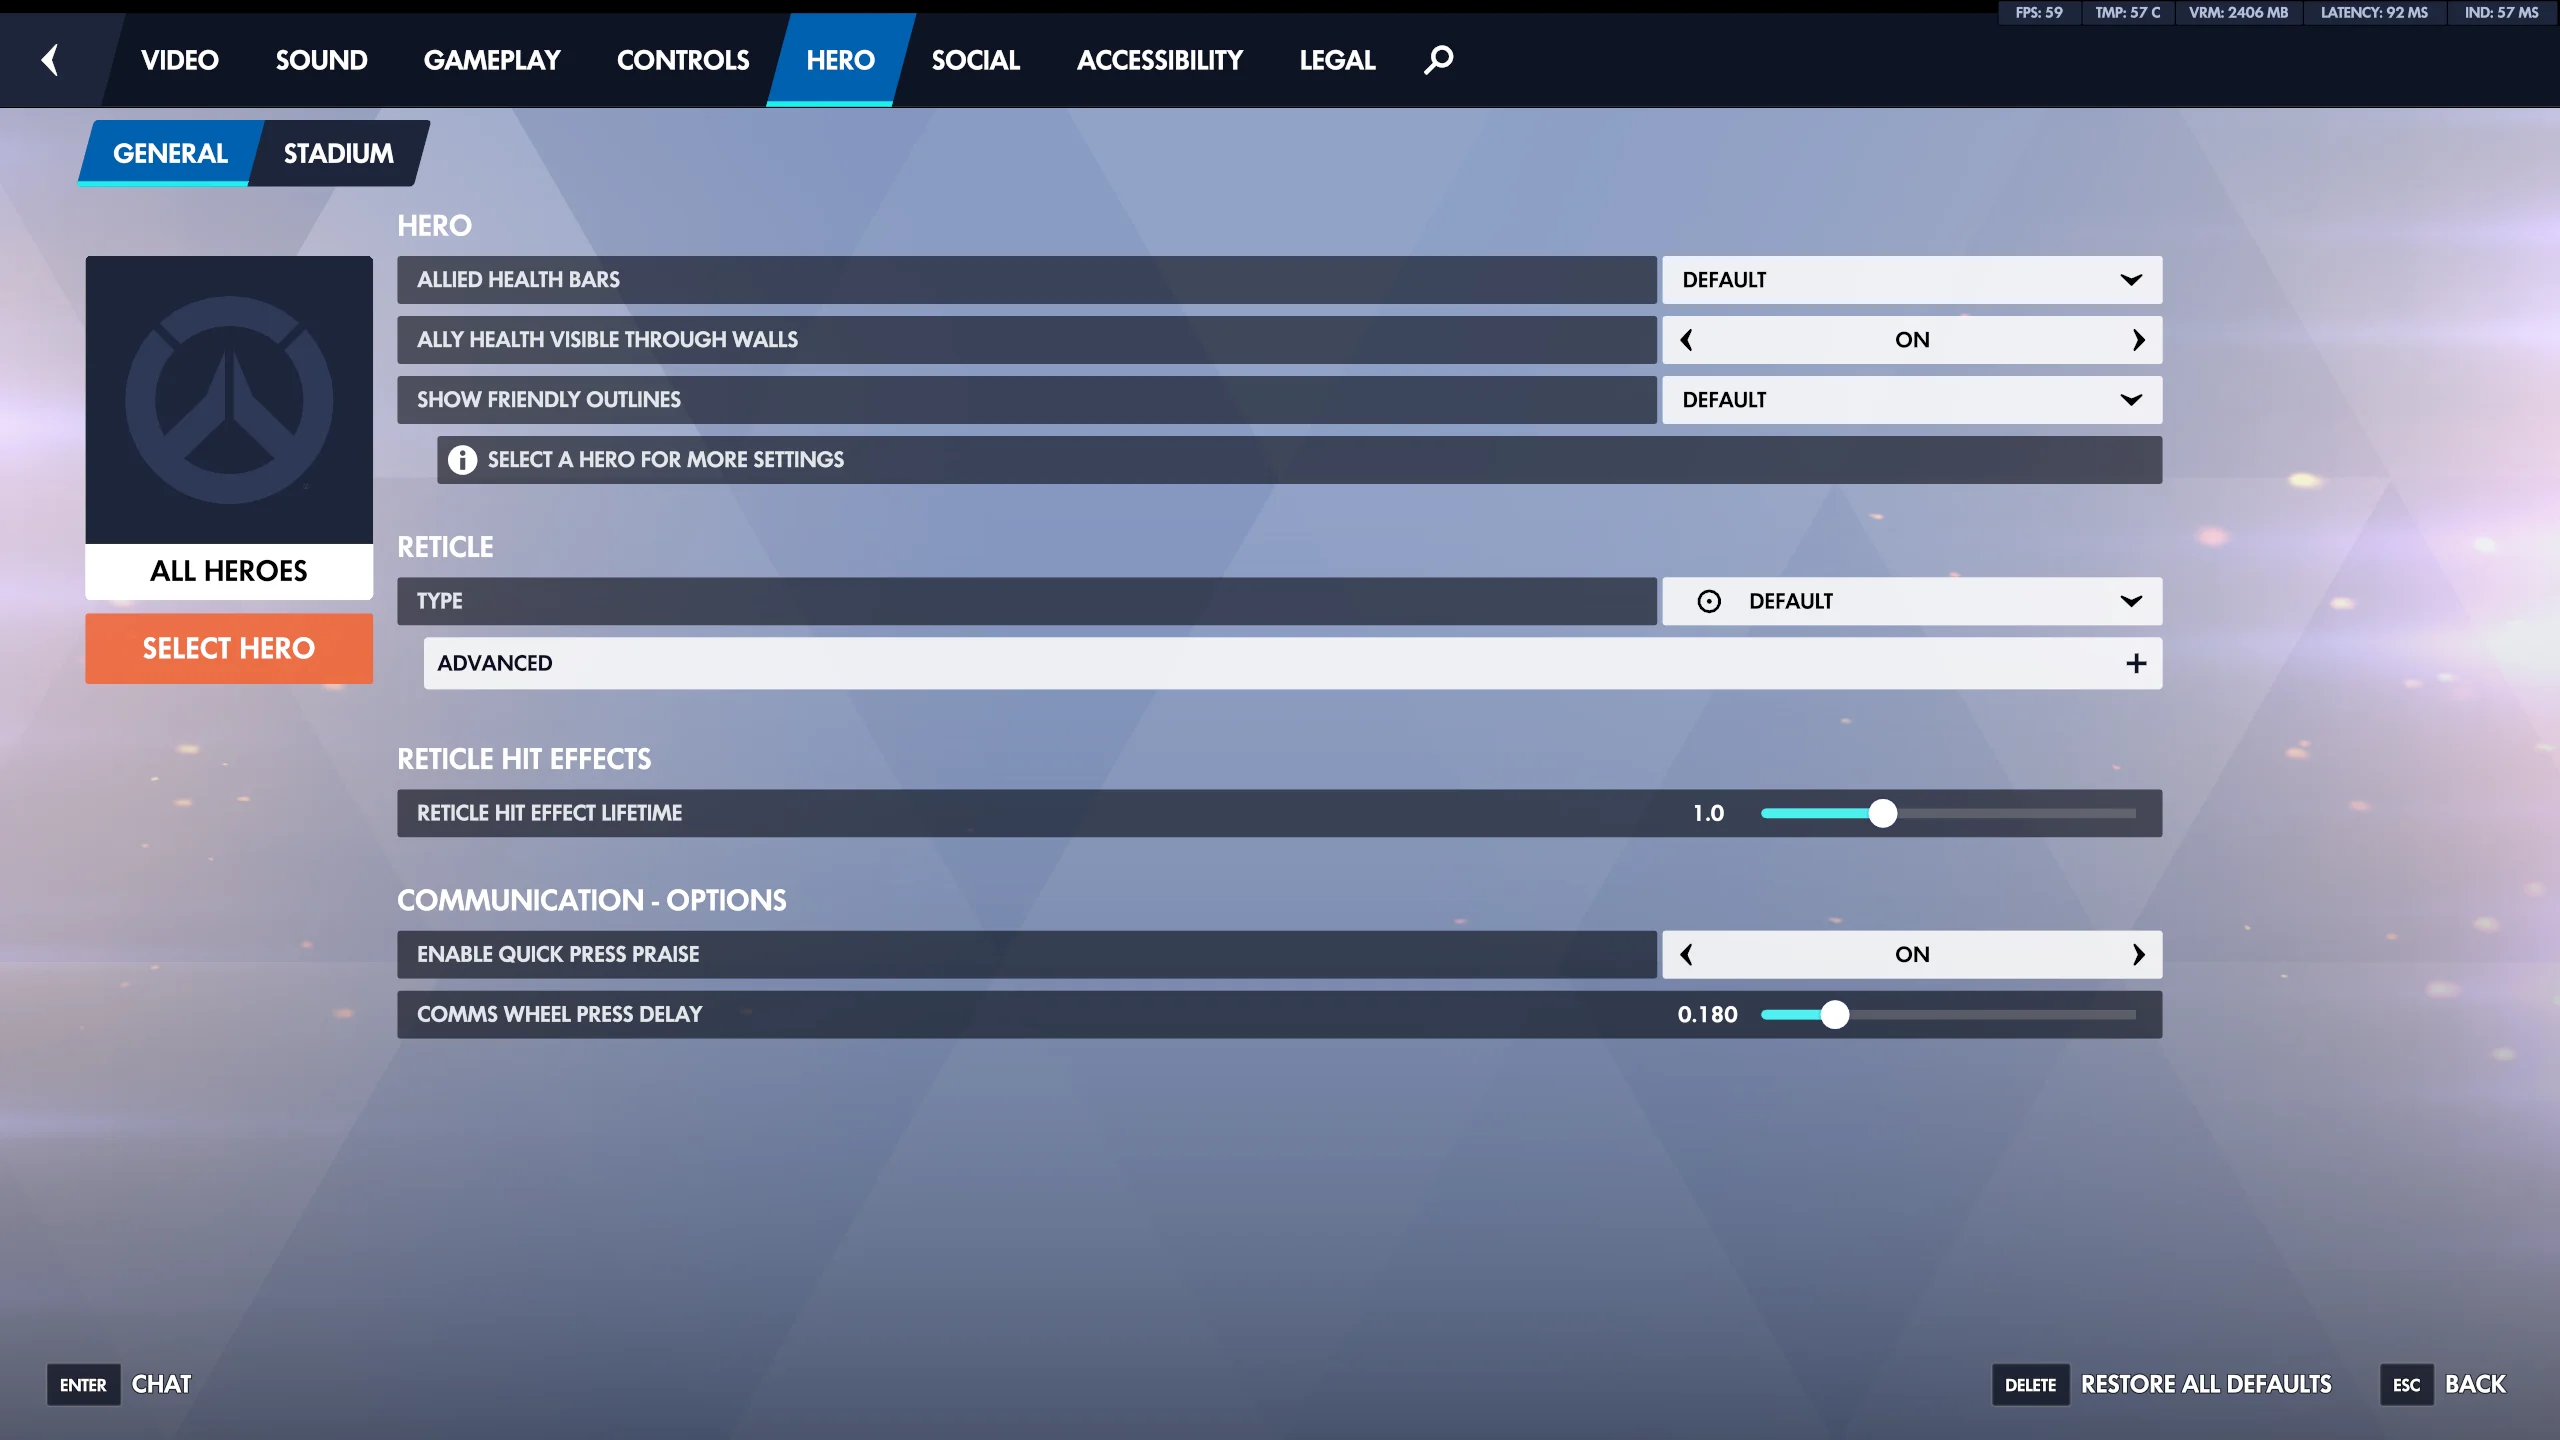
Inside Options, open the Hero tab. Near the top, you should see a hero selection area. If you leave it on All Heroes, your reticle changes will apply to every hero that does not already have custom settings.
To customize one hero only, select that hero from the list. This is especially useful because different heroes benefit from different reticles. For example, Widowmaker and Cassidy often work well with a small dot or crosshair, while heroes such as Zarya or Symmetra may feel better with a larger circle or crosshair that helps with tracking.
Step 3: Find the Reticle Settings
Scroll through the Hero screen until you find the Reticle section. In many versions of Overwatch, you will see a basic Type option first, followed by an Advanced section that reveals more detailed controls.
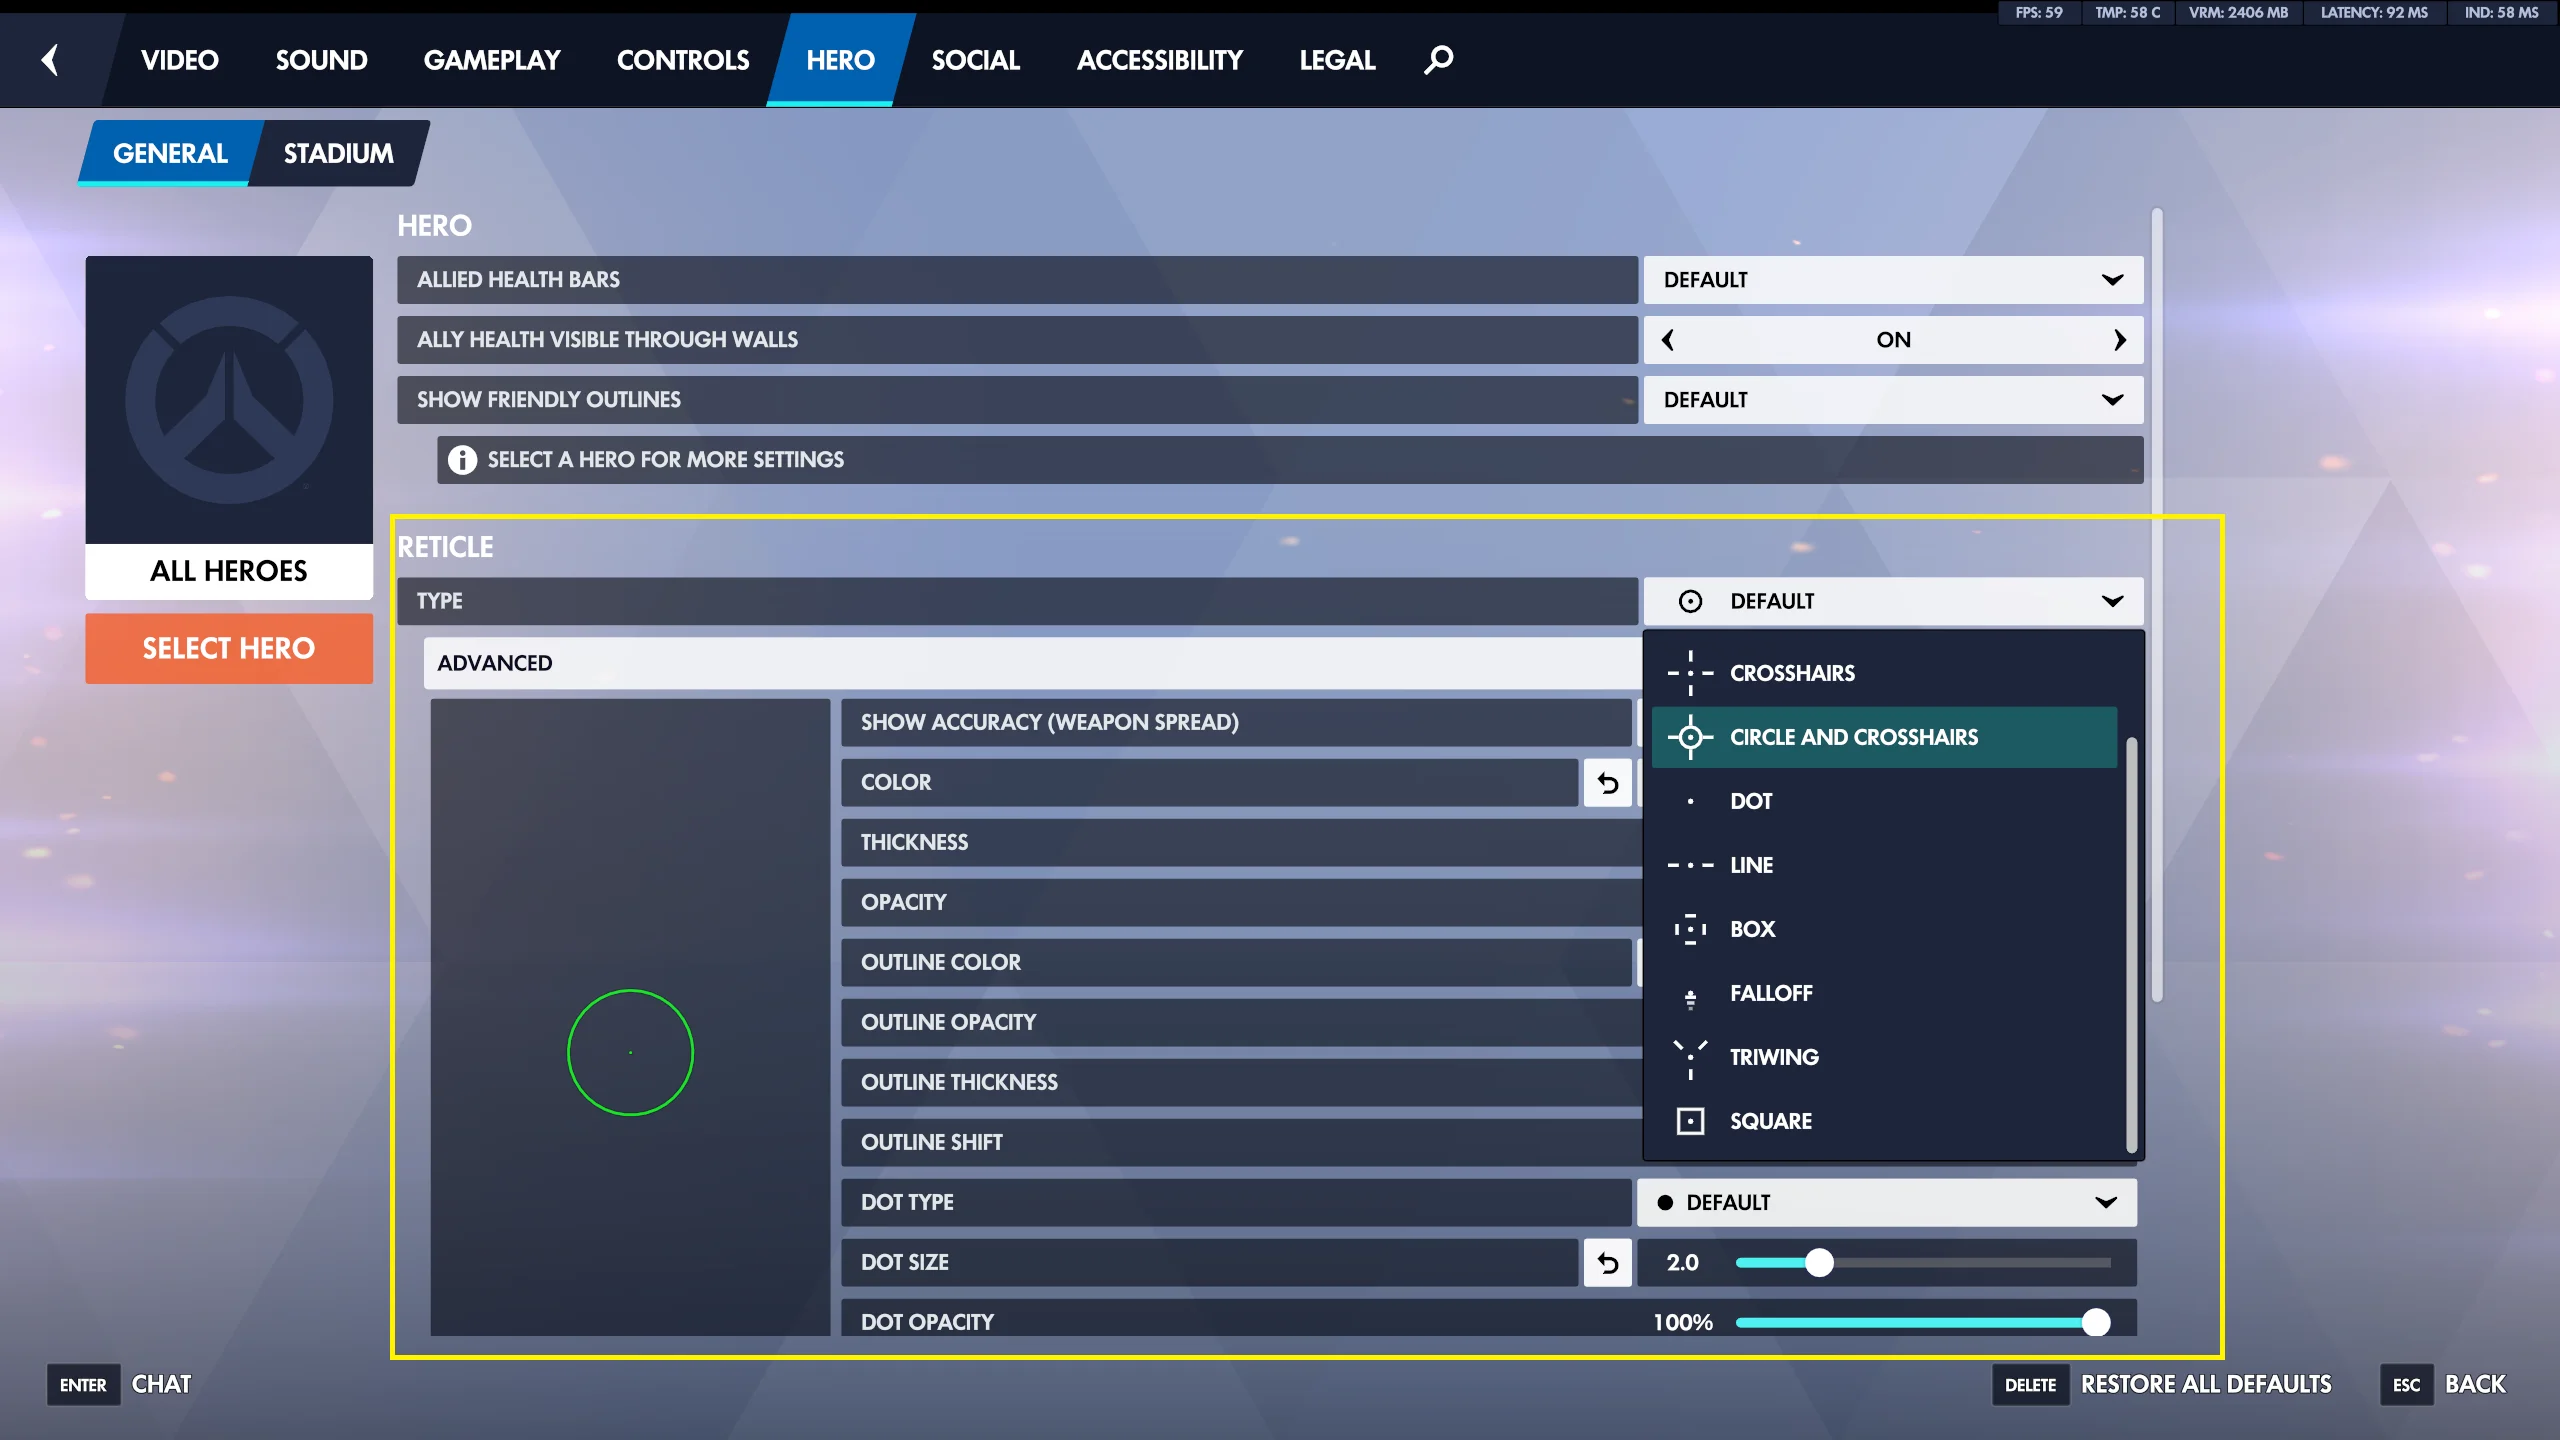
The main reticle types commonly include options such as Default, Circle, Crosshairs, Circle and Crosshairs, and Dot. Choose the general shape first, then fine-tune it with the advanced settings.
Step 4: Pick a Reticle Type
Choose a reticle type based on how the hero aims. For hitscan heroes such as Soldier: 76, Cassidy, Ashe, Baptiste, and Widowmaker, a simple dot or small crosshair is popular because it does not cover the target. These heroes depend on precise placement, so a clutter-free reticle helps you see heads and small movement changes.
For projectile heroes such as Hanzo, Kiriko, Zenyatta, Mei, or Pharah, a slightly larger crosshair can help you line up shots while accounting for travel time. For beam or tracking heroes such as Zarya, Moira, Symmetra, and Echo, a circle or circle-and-crosshair setup can make it easier to keep your aim centered on moving targets.
Step 5: Adjust Advanced Reticle Settings
Open Advanced under the reticle section to change the detailed appearance. The most important settings are usually Color, Thickness, Crosshair Length, Center Gap, Opacity, Outline Opacity, Dot Size, and Dot Opacity.
Color affects visibility more than many players expect. Bright green, cyan, magenta, and yellow are common choices because they stand out against most maps and enemy outlines. Avoid colors that blend into your enemy outline color, ability effects, or the map lighting you struggle with most.
Thickness controls how wide the crosshair lines are. A lower value gives a cleaner look, while a higher value is easier to see. Crosshair Length changes how long the lines extend from the center. Center Gap controls the empty space in the middle; a smaller gap is better for precision, while a larger gap can keep enemy heads visible.
Opacity determines how visible the reticle is. Most players keep it high, often near 80 to 100, so the crosshair remains easy to see during chaotic fights. Outline Opacity adds contrast around the reticle, which can help if your chosen color disappears on bright maps. Dot Size and Dot Opacity matter if you use a dot alone or combine a dot with crosshair lines.
Step 6: Disable or Enable Accuracy Indicators
Some reticle settings include an option such as Show Accuracy. When enabled, the crosshair may expand or change to represent weapon spread or accuracy. This can be useful for new players learning how a weapon behaves, but many experienced players turn it off because the movement can be distracting.
If you want a consistent aiming reference, set Show Accuracy to Off. If you are learning a hero’s weapon spread, recoil timing, or recovery between shots, try leaving it on for a while in the practice range, then decide whether it helps.
Step 7: Test the Reticle in the Practice Range
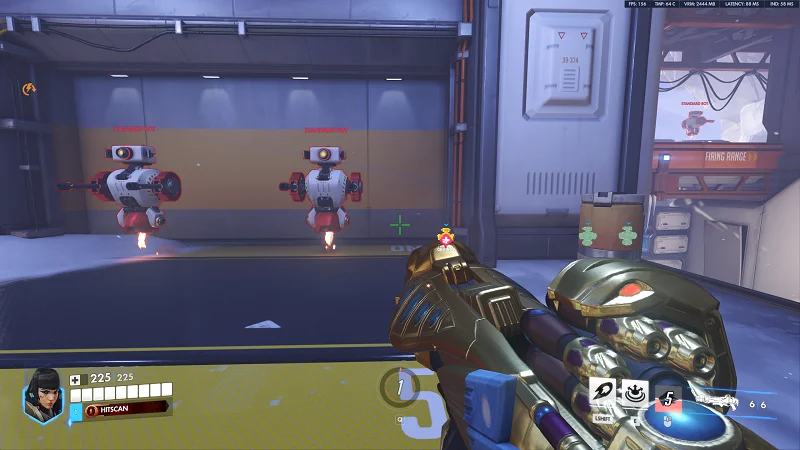
After changing your settings, enter the Practice Range and test the reticle at different distances. Shoot stationary bots, then track moving bots, then practice flicking between targets. Pay attention to whether the reticle blocks heads, disappears in bright areas, or feels too large during close-range fights.
Do not judge a crosshair only by how it looks in the menu. A reticle that looks stylish may be hard to use during real fights with explosions, barriers, healing effects, and enemy movement. The best reticle is the one you can see clearly while still keeping the target visible.
Step 8: Save Hero-Specific Reticles
If one reticle does not feel right for every hero, return to Options -> Controls and select a specific hero from the hero list. Adjust that hero’s reticle separately. Repeat this for heroes with very different aiming needs.
A practical setup is to use a small dot or small crosshair for precision heroes, a medium crosshair for projectile heroes, and a visible circle or circle-and-crosshair for tracking heroes. Keep the colors consistent if you prefer muscle memory and visual familiarity, or use different colors to remind yourself that a hero has a special setup.
Step 9: Try Recommended Starting Settings
If you are unsure where to begin, try a simple precision crosshair: Type set to Crosshairs, a bright green or cyan Color, low Thickness, short-to-medium Crosshair Length, small Center Gap, high Opacity, and moderate-to-high Outline Opacity. Turn Show Accuracy off for a stable reticle.
For a dot setup, choose Dot or set the crosshair lines to minimal visibility and enable a small dot. Keep Dot Size small enough that it does not cover enemy heads at long range. For tracking heroes, use Circle or Circle and Crosshairs, then make the circle large enough to follow movement without hiding the target.
Conclusion
To customize your Overwatch crosshair, open Options -> Hero, choose All Heroes or a specific hero, then adjust the Reticle type and advanced settings. Focus on visibility, consistency, and target clarity rather than copying a popular setting exactly.
The best reticle is personal, so test changes in the practice range and make small adjustments over time. Once your crosshair is easy to see and does not block important details, you can spend less time fighting the interface and more time focusing on aim, positioning, and game sense.
