Overview
Changing graphics quality in Overwatch is done from the in-game Video settings menu. On PC, you can choose a preset such as Low, Medium, High, Ultra, or Epic, then fine-tune individual settings like textures, shadows, effects, render scale, and frame rate. On console, the available options are more limited, but some platforms still provide display or performance-related settings.
The best setup depends on your goal. Competitive players usually prioritize stable FPS and low input delay, while casual players may prefer sharper textures and better lighting. The steps below cover the safest way to adjust graphics quality without making the game unstable or hard to play.
How to Change Graphics Quality in Overwatch
Use the PC method if you play through Battle.net or Steam on Windows. Use the console method if you play on PlayStation, Xbox, or Nintendo Switch. If your changes cause poor performance, stuttering, or visual problems, use the reset section at the end.
Change Graphics Quality on PC
This is the main method for changing Overwatch graphics quality. PC players have the most control because the game exposes both preset and advanced graphics options. Before changing anything, close unnecessary background apps so you can judge performance accurately after applying your new settings.
Step 1: Open the Options Menu
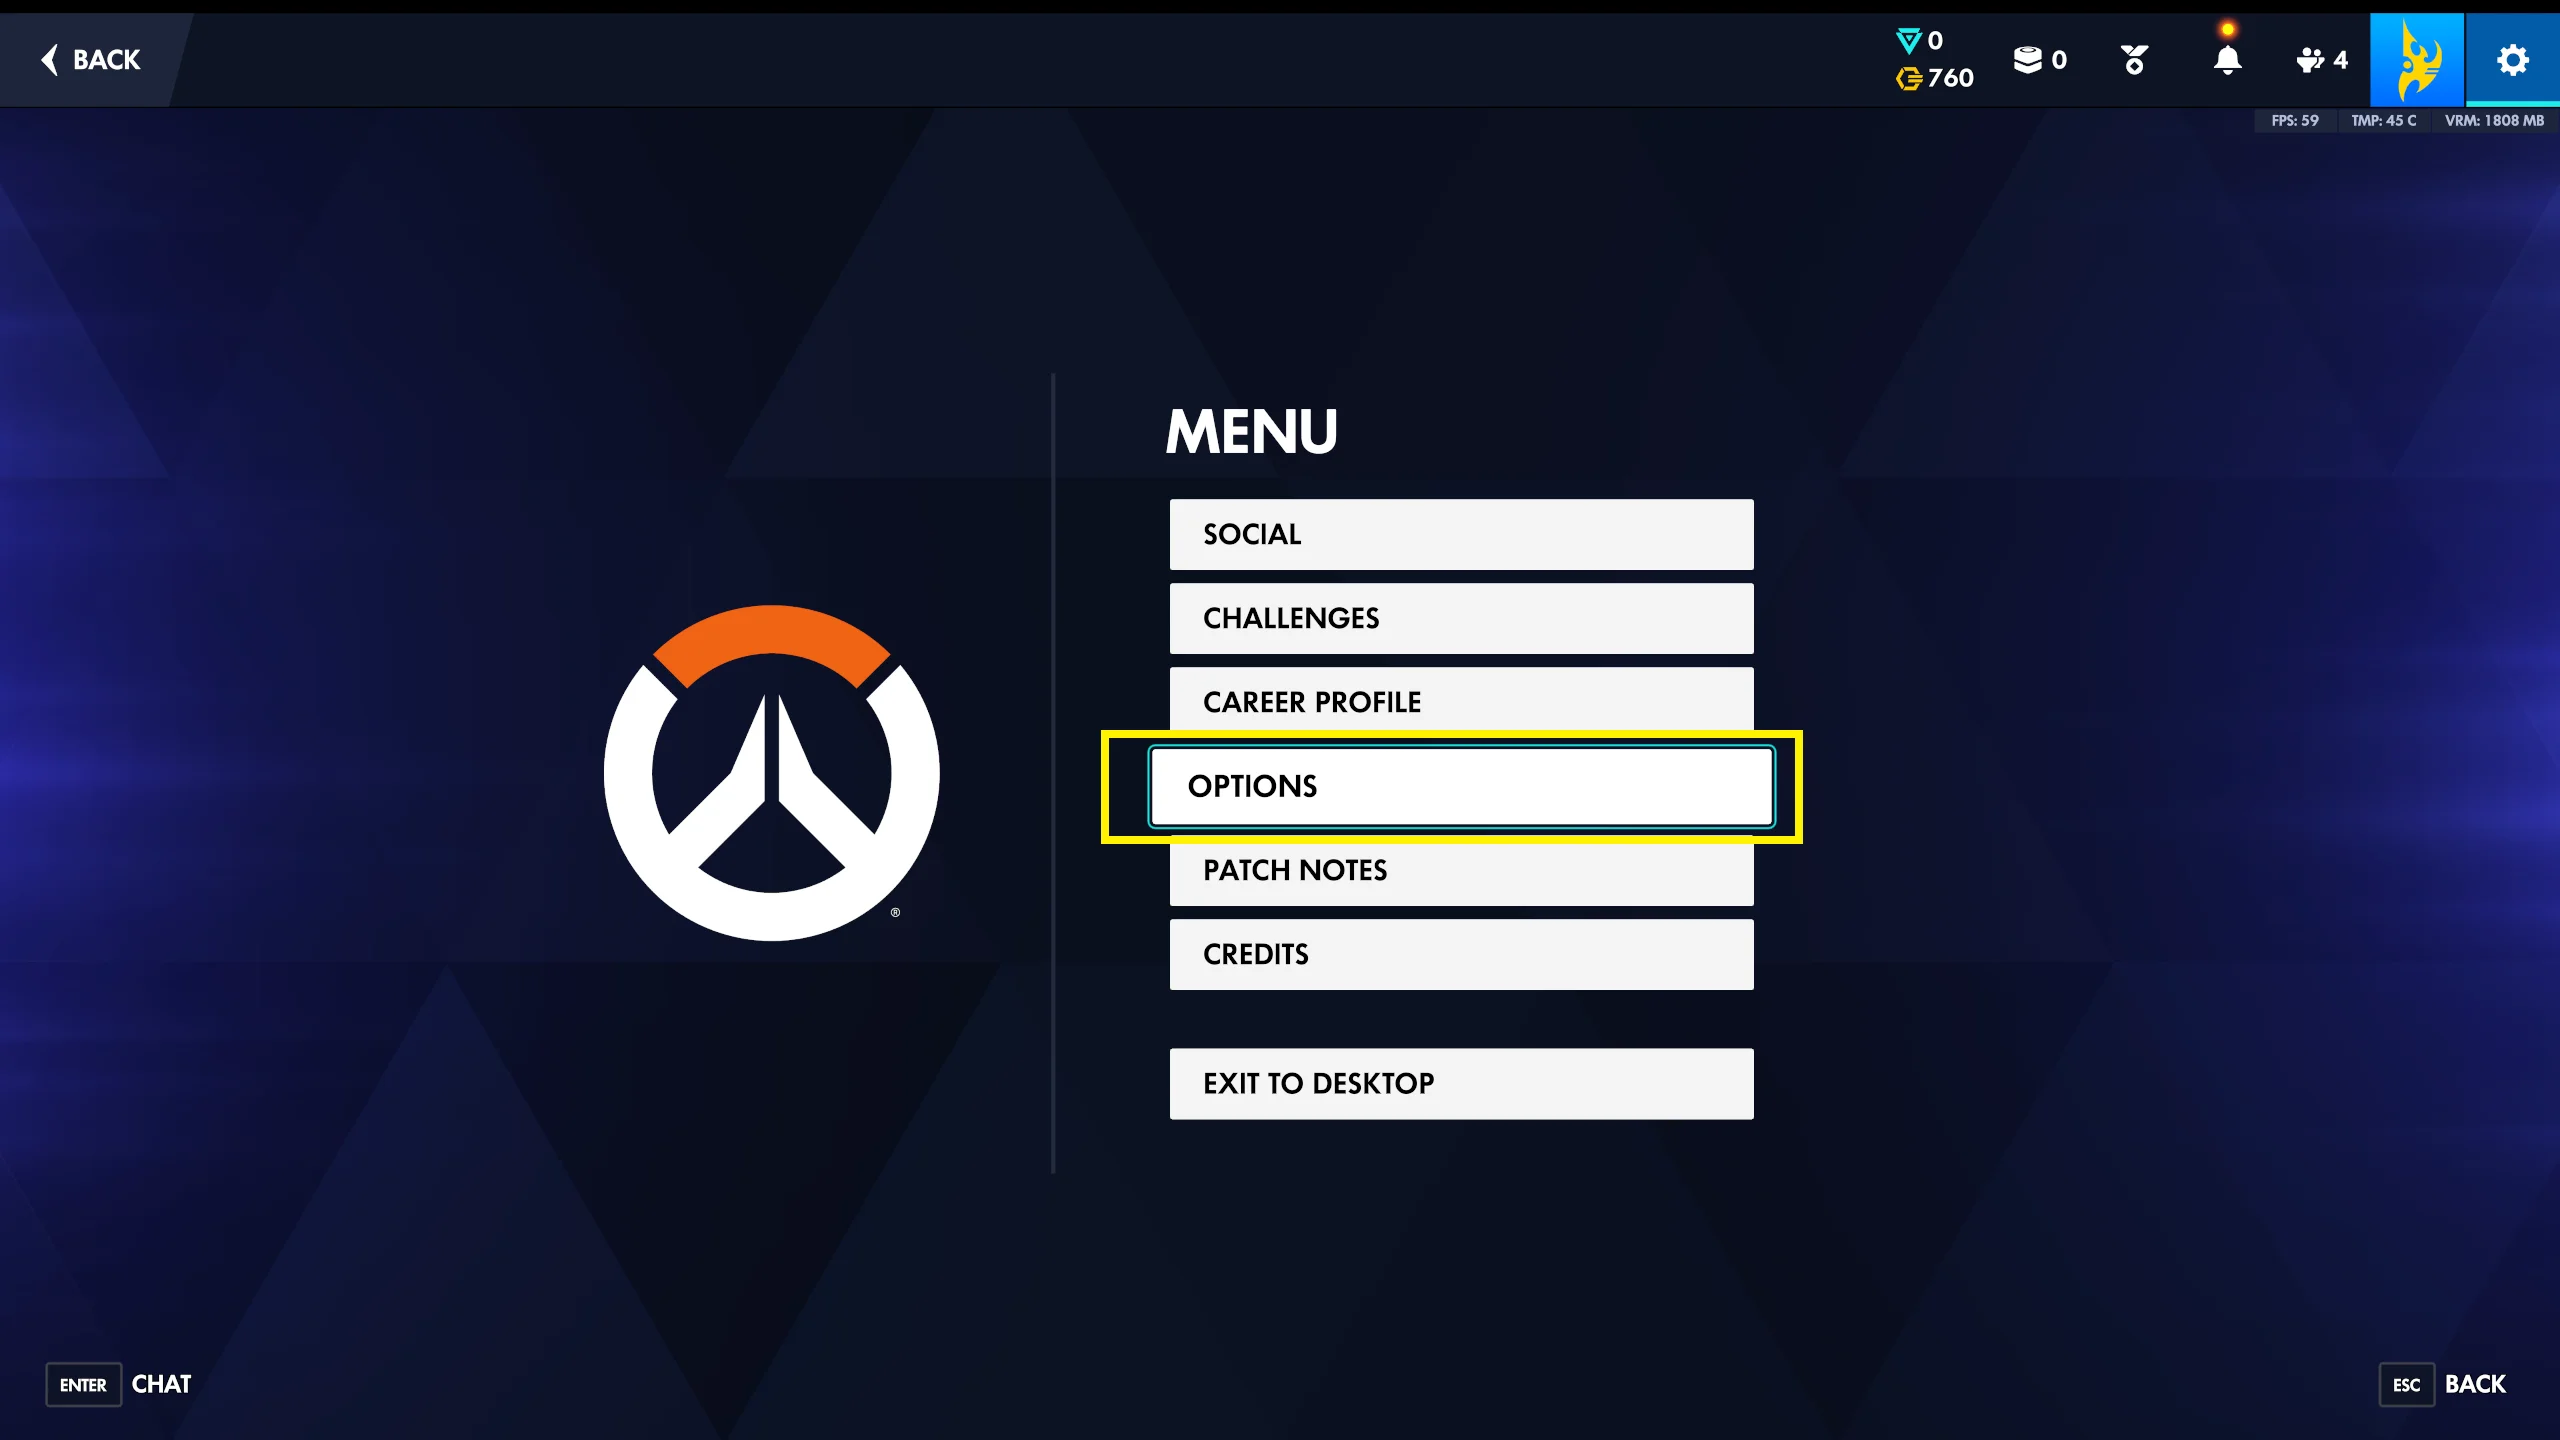
Launch Overwatch and wait until you reach the main menu. Press Esc, then select Options. If you are already in a match or Practice Range, you can still open the same menu, but it is safer to make major graphics changes from the main menu to avoid distraction or lag spikes.
In the Options screen, select the Video tab, and then select the General tab. This is where Overwatch keeps display, resolution, frame rate, and graphics quality controls.
Step 2: Check Display and Resolution First
Before using the graphics preset, confirm that your display settings are correct. Set Display Mode to Fullscreen for the lowest input latency on many systems, or Borderless Windowed if you frequently switch between apps. Then choose your monitor’s native Resolution, such as 1920 x 1080, 2560 x 1440, or 3840 x 2160.
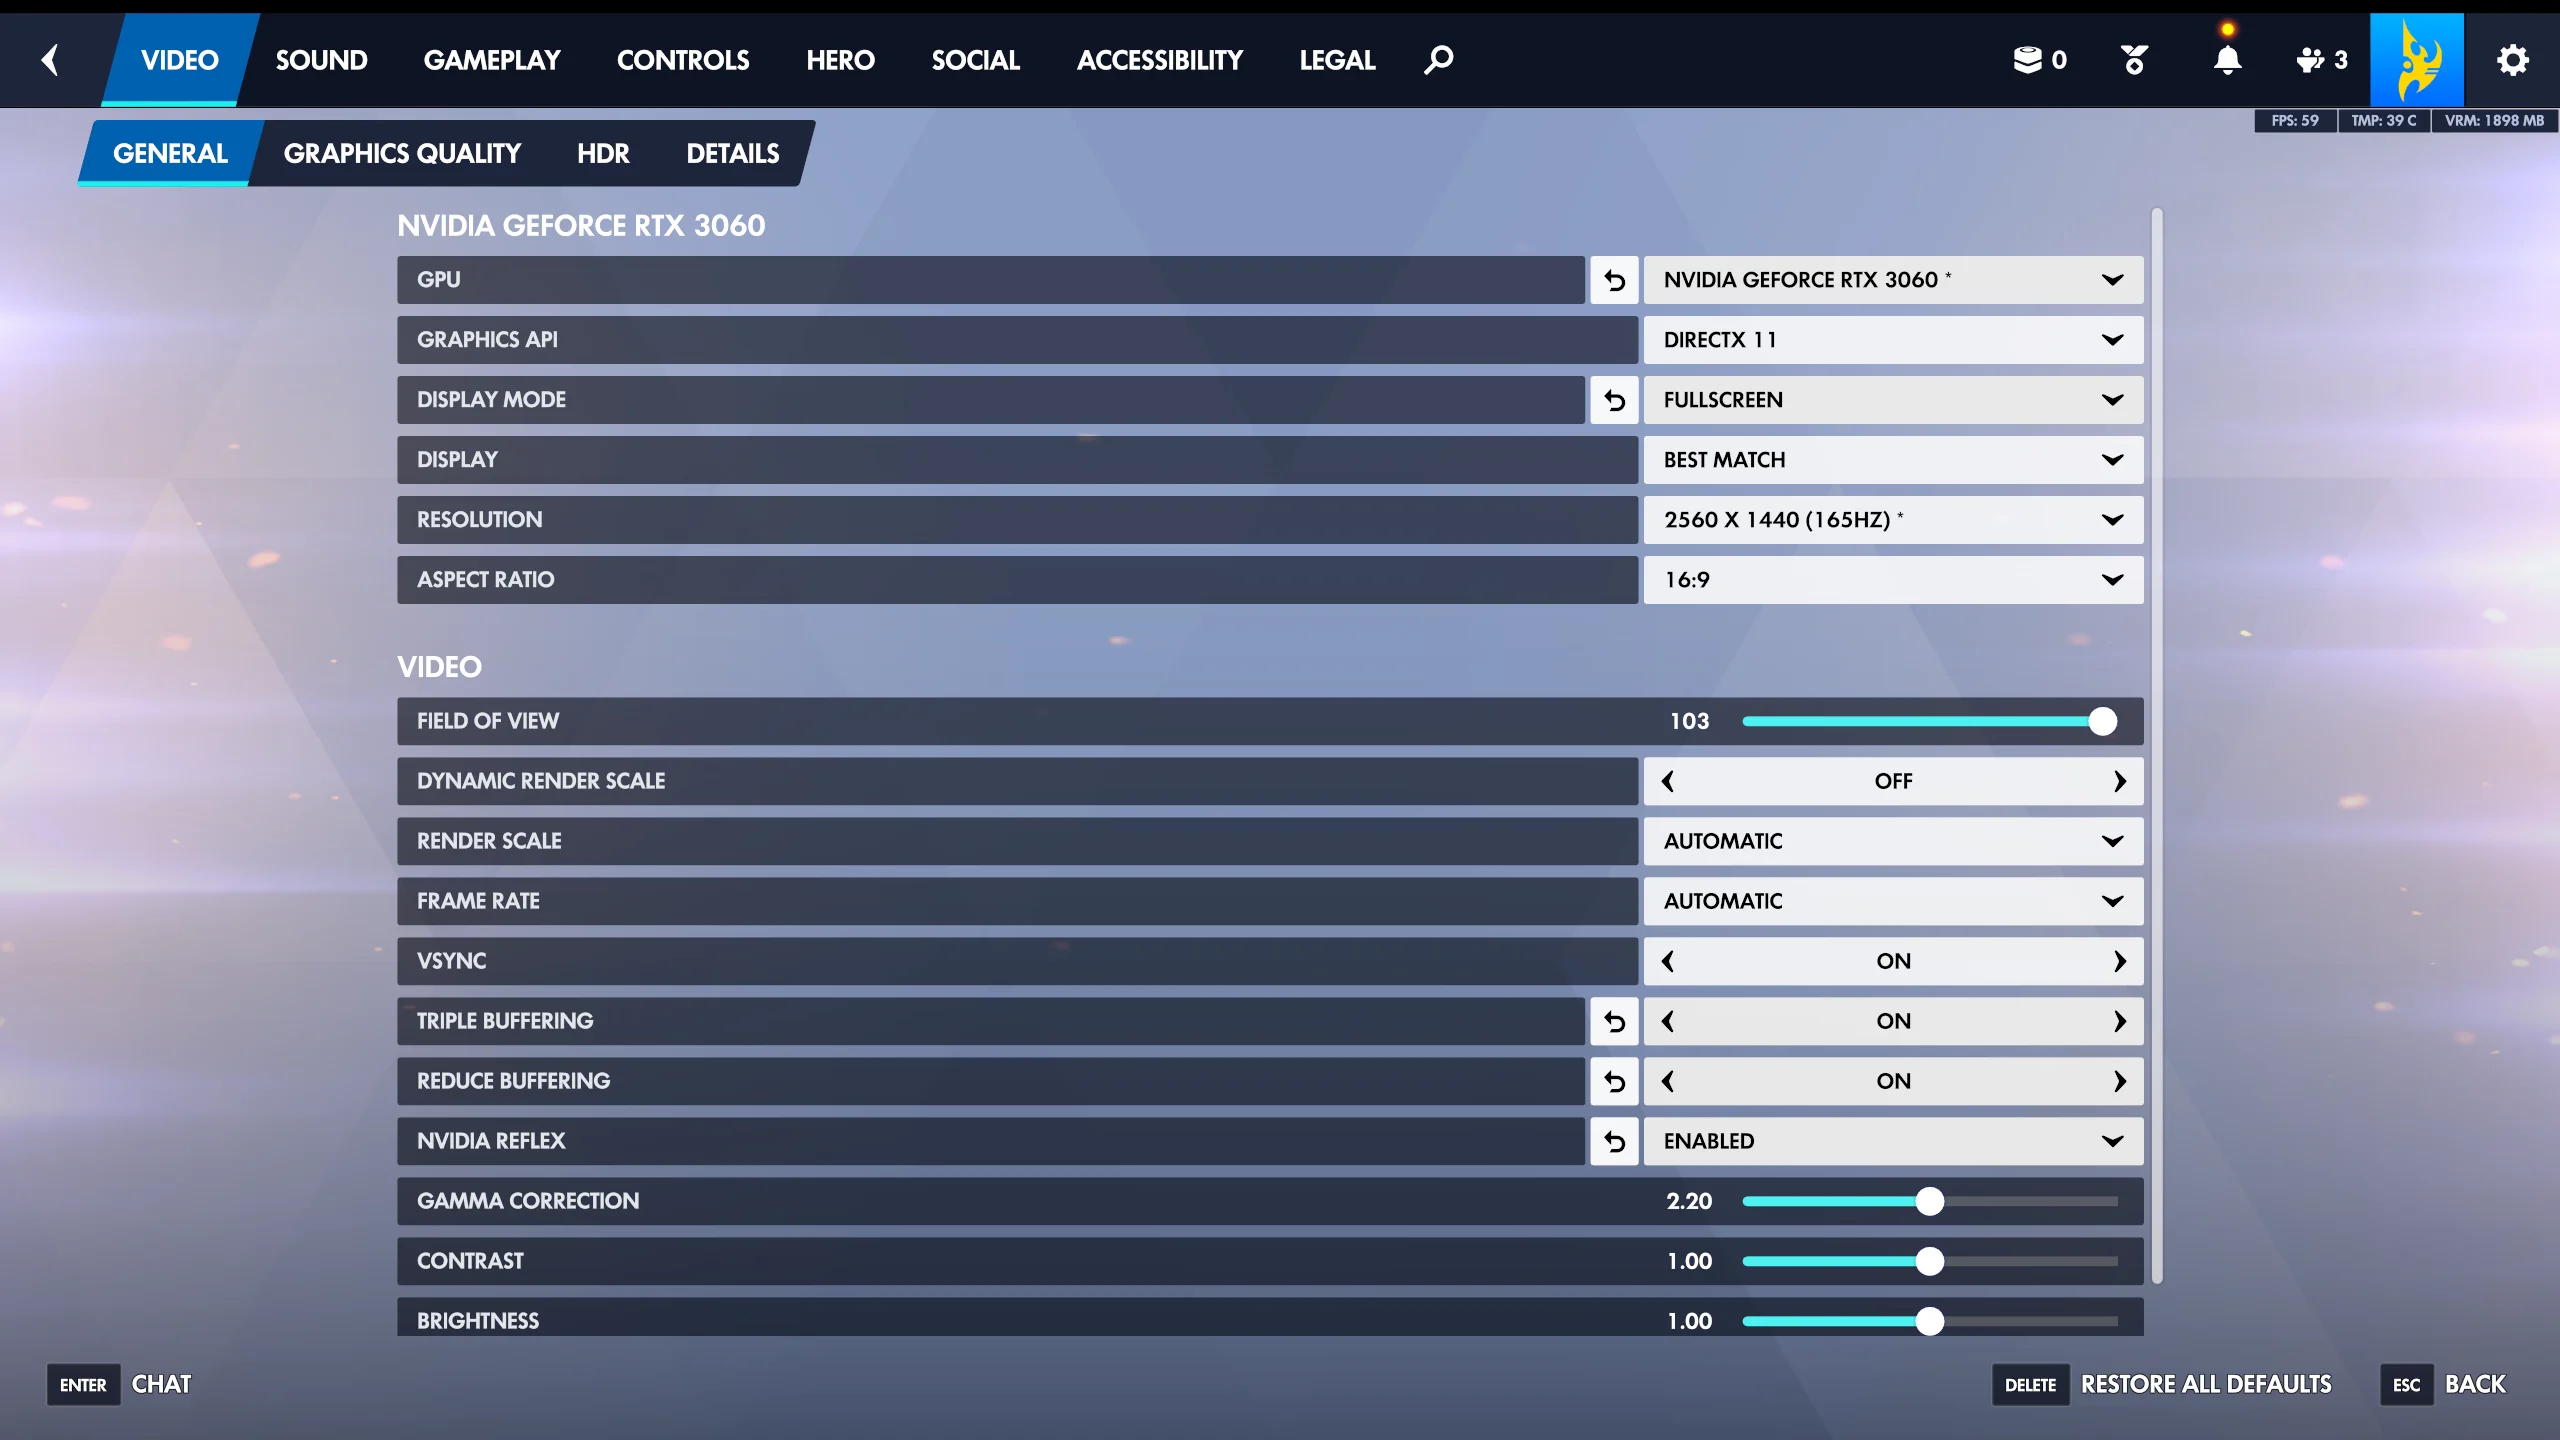
Also review Field of View and Render Scale. A render scale of 100% is the normal baseline. Lowering it can improve FPS, but the image becomes softer. Raising it can make the game sharper, but it is one of the most demanding graphics changes you can make.
Step 3: Choose a Graphics Quality Preset
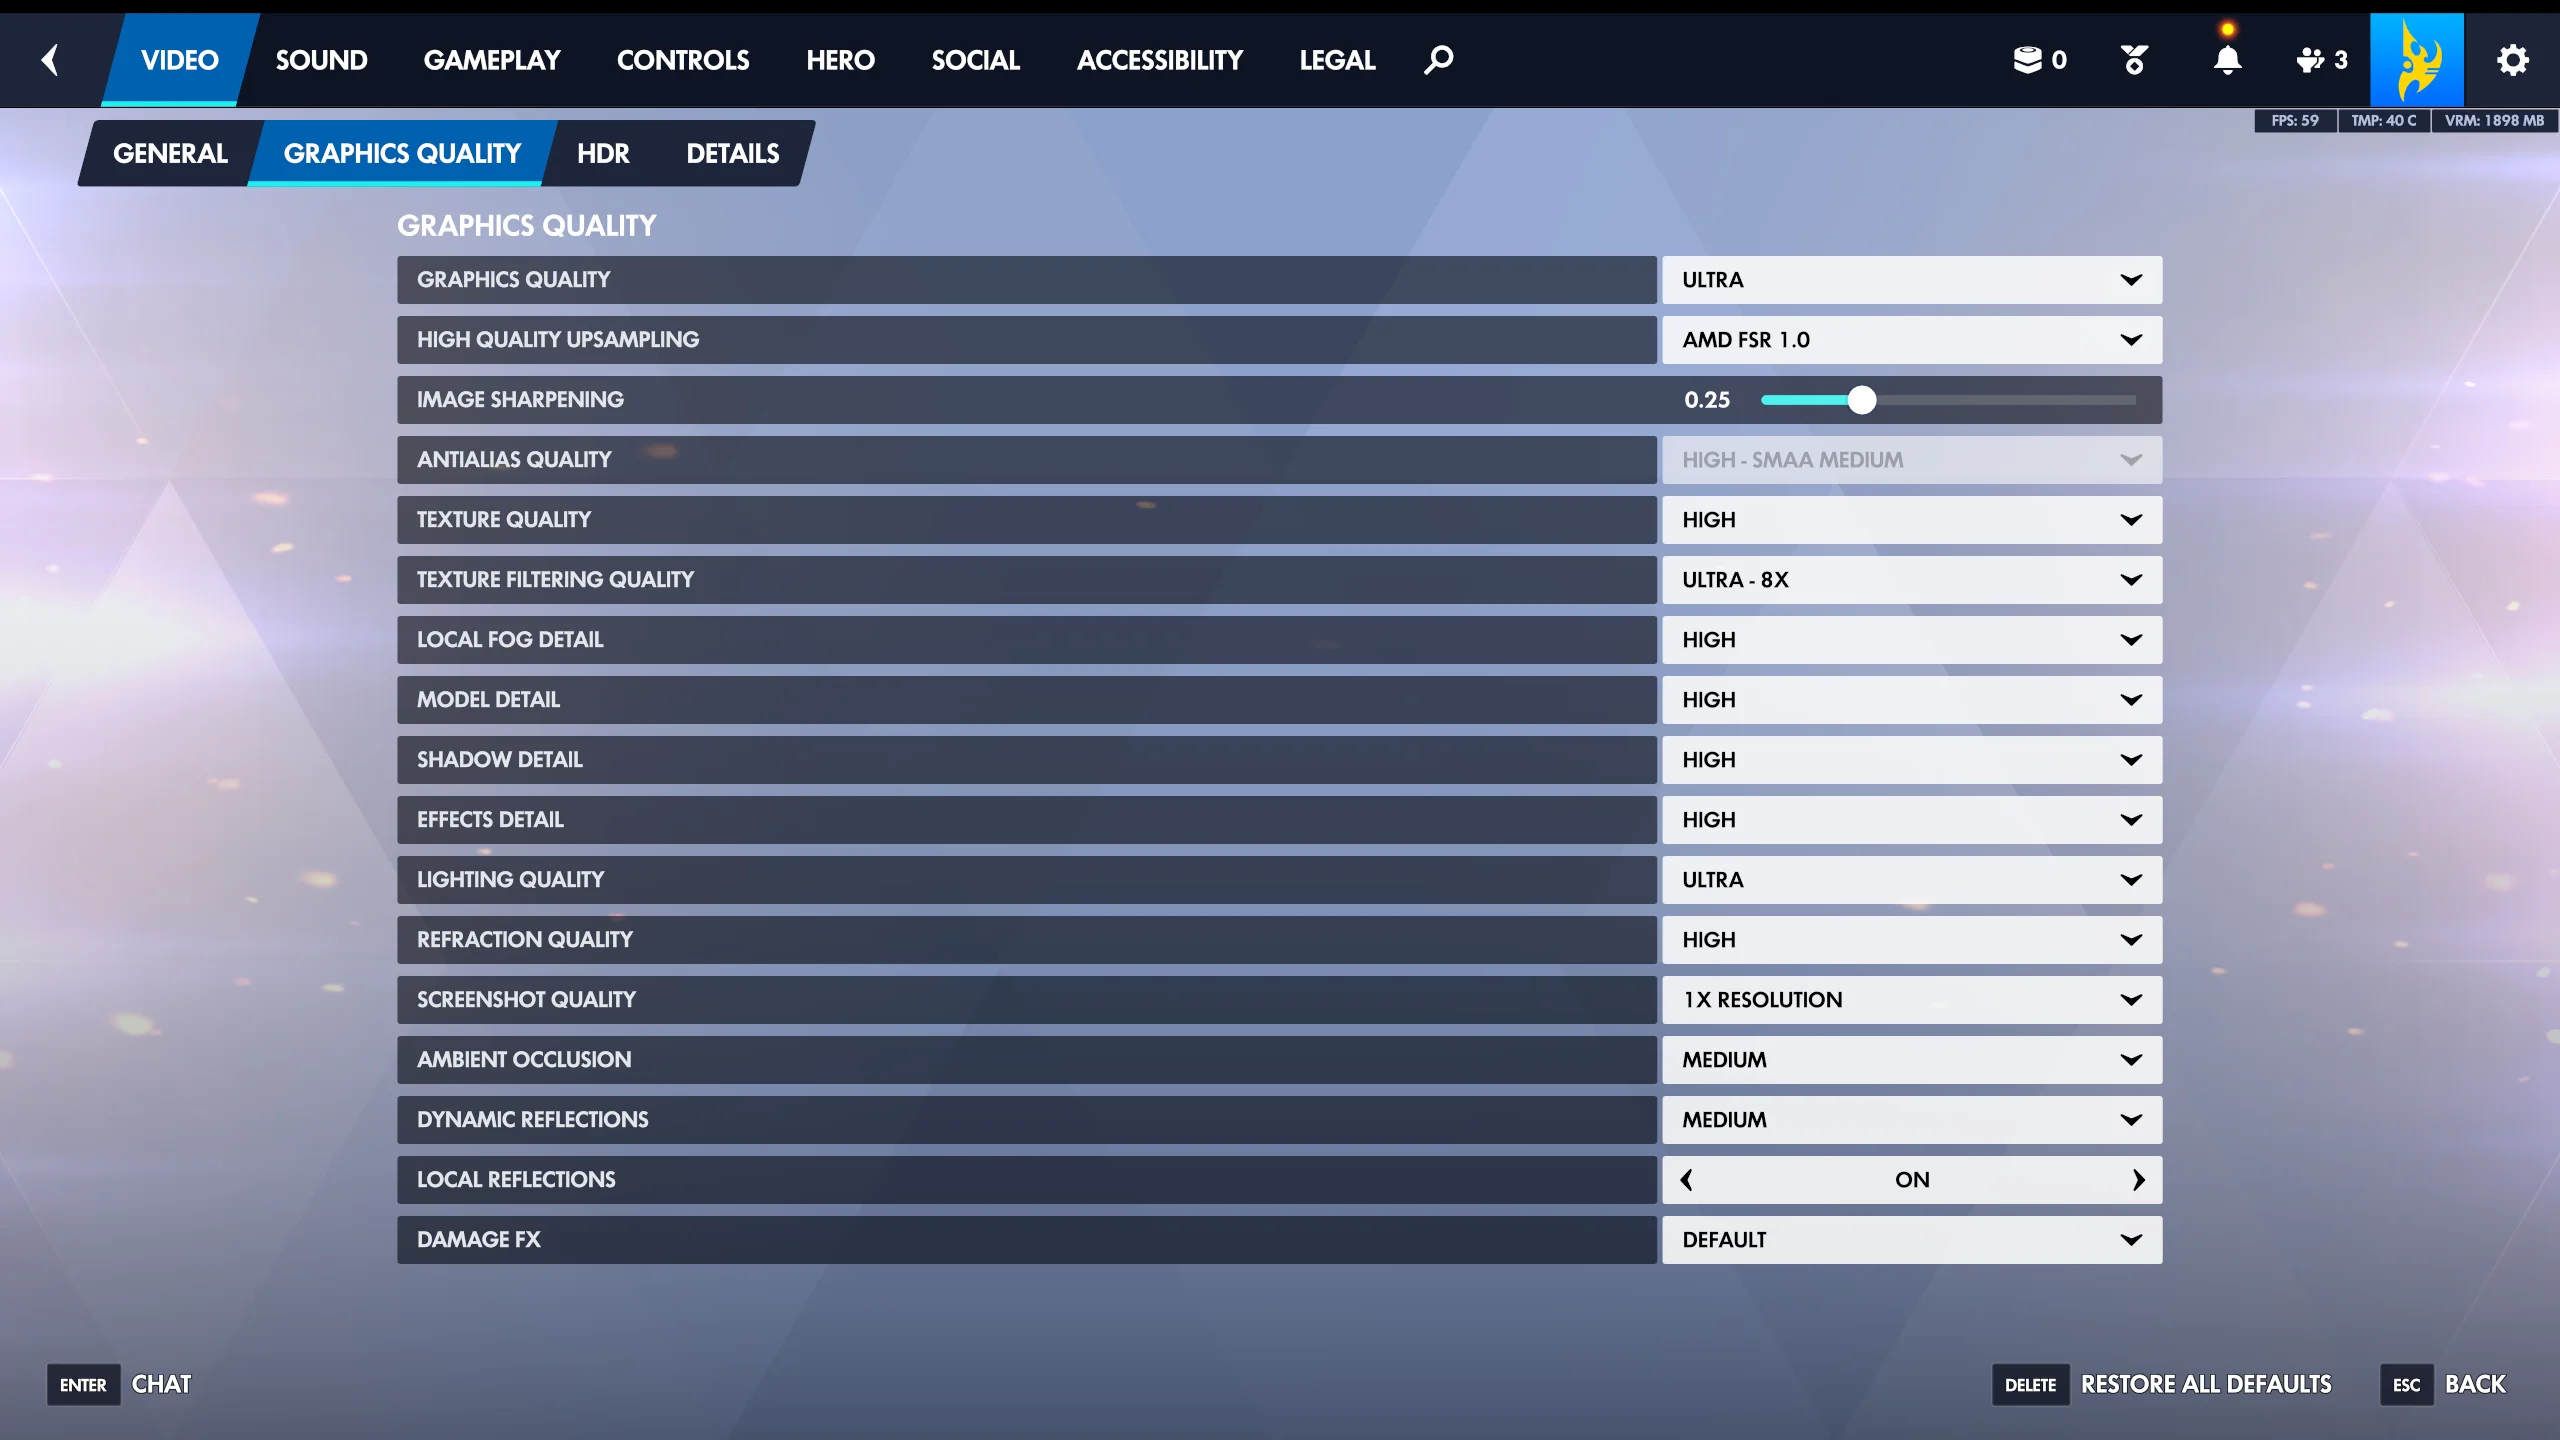
Select the Graphics Quality tab. Open the dropdown and choose a preset. Low is best for maximum FPS and older hardware. Medium is a good balanced option. High, Ultra, and Epic improve visual detail but require stronger hardware.
If your main goal is competitive performance, start with Low or Medium. If your FPS remains consistently above your monitor’s refresh rate, you can raise individual settings later. If your goal is visual quality, start with High and increase only the settings that matter most to you.
Step 4: Fine-Tune Advanced Graphics Settings
After selecting a preset, keep staying on the Graphics Quality tab, expand or review the advanced graphics options. Some settings have a larger performance impact than others. Shadow Detail, Dynamic Reflections, Effects Detail, and high Render Scale can reduce FPS noticeably. Lowering these often gives a major performance boost with less impact on gameplay clarity.
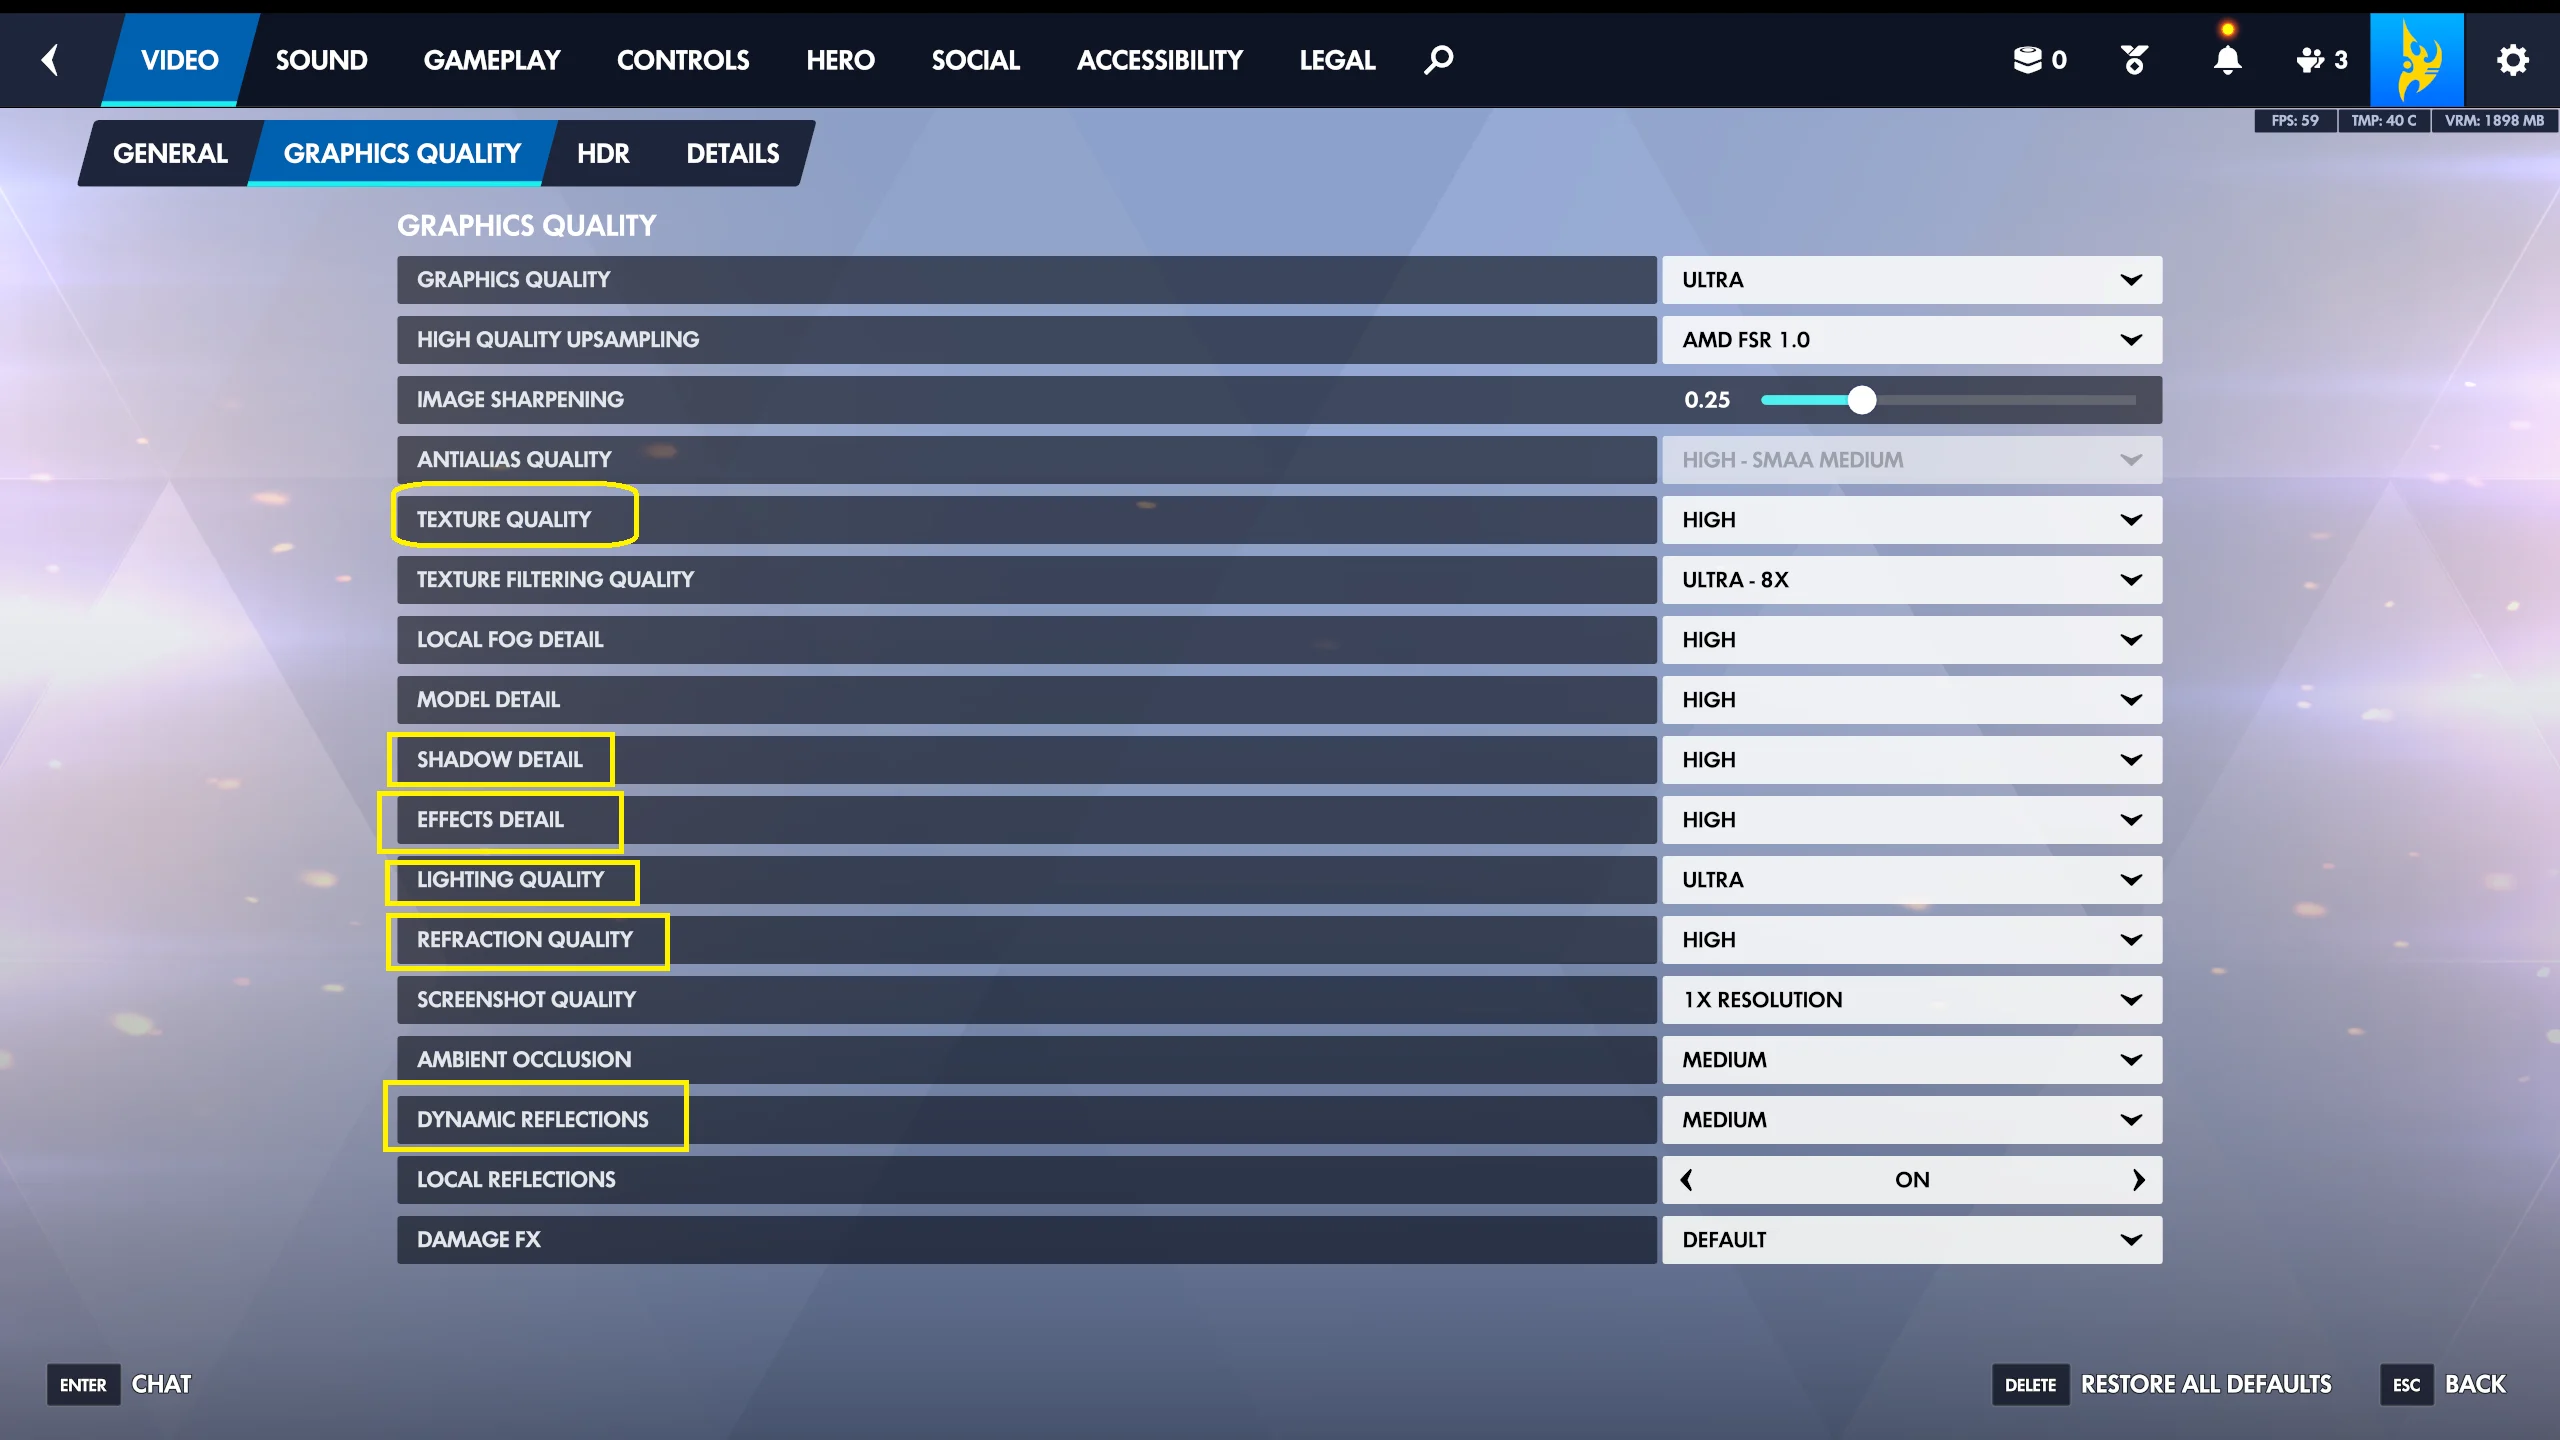
For a competitive setup, consider keeping Texture Quality at Medium or High if you have enough VRAM, but lowering Shadow Detail, Fog Detail, Local Reflections, and Dynamic Reflections. For a visual setup, raise Texture Quality, Model Detail, and Lighting Quality first, then test whether shadows and reflections are worth the performance cost.
Step 5: Apply Changes and Test FPS
Click Apply if the game prompts you to confirm the changes. Some settings take effect immediately, while others may require restarting the game. If Overwatch asks you to restart, finish adjusting the settings, close the game normally, then launch it again.
To test your result, enter the Practice Range or a Quick Play match and watch for stutters, blurry visuals, or FPS drops during team fights. You can enable performance stats from the Video settings if you want to monitor FPS, latency, and GPU-related information while playing.
Adjust Graphics or Performance Options on Console
Console versions of Overwatch do not offer the same full graphics menu as PC. You generally cannot choose every texture, shadow, and effects setting manually. However, depending on your console and game version, you may see display or performance options that affect how smooth or sharp the game feels.
Open Overwatch, go to Options -> Video, and review the available settings. If your version includes a mode such as Framerate, Balanced, or Resolution, choose Framerate for smoother gameplay or Resolution for sharper image quality. If you do not see these options, your console version is using a fixed graphics profile.
You should also check your console’s system settings. On PlayStation or Xbox, make sure the console is set to the correct output resolution and refresh rate for your TV or monitor. If your display supports 120 Hz and Overwatch offers a high-frame-rate mode, enable the required 120 Hz option in the console display settings first.
Use Recommended Settings for Common Goals
If you are unsure what to choose, start with one of these practical profiles, then adjust based on how the game feels.
For maximum FPS on PC, use Display Mode -> Fullscreen, set Render Scale to 75% to 100%, choose Graphics Quality -> Low, disable or lower reflections and shadows, and cap FPS slightly below or near your monitor’s refresh rate if you want smoother frame pacing.
For balanced quality, use your native resolution, set Render Scale to 100%, choose Graphics Quality -> Medium or High, keep textures at Medium or High, and lower only the most expensive settings if you notice drops during fights.
For best visuals, use native resolution, Render Scale at 100% or higher only if your GPU can handle it, choose Graphics Quality -> Ultra or Epic, and test in real matches because the Practice Range is often less demanding than a full team fight.
Reset Graphics Settings if Something Goes Wrong
If the screen becomes blurry, FPS becomes unstable, or the game no longer looks right, return to Options -> Video and lower the preset one level. You can also use the reset option in the settings menu, if available, to restore defaults.
If you cannot comfortably open the game after changing settings, use the Battle.net or Steam repair options, update your GPU driver, or reset the game’s configuration through the launcher settings. Avoid changing multiple outside settings at once; reset one thing at a time so you can identify what fixed the issue.
Conclusion
To change graphics quality in Overwatch, open Options -> Video, choose a Graphics Quality preset, then fine-tune advanced options such as render scale, shadows, effects, reflections, and textures. PC players get the most control, while console players may only have a few performance or display modes.
For competitive play, prioritize stable FPS and clear visibility over maximum detail. For casual play or screenshots, raise quality gradually and test after each change. The best graphics setting is the one that looks good while staying smooth during the busiest moments of a match.


